Drive train
Replacing the timing belt
Removing the timing belt
Note! As the illustrations in this service information are used for different model years and / or models, some variation may occur. However, the essential information is always correct.
PreparationCaution! Remove the ignition key. Remove:-the tie strap for the servo hose from the engine stabiliser brace -the cross stay between the suspension turrets -the timing belt cover -the servo reservoir. Lift up and place on top of the engine. Warning! Ensure that no power steering fluid is spilled. It is extremely flammable! Remove the auxiliaries belt. |
Position the engine according to the marking | |
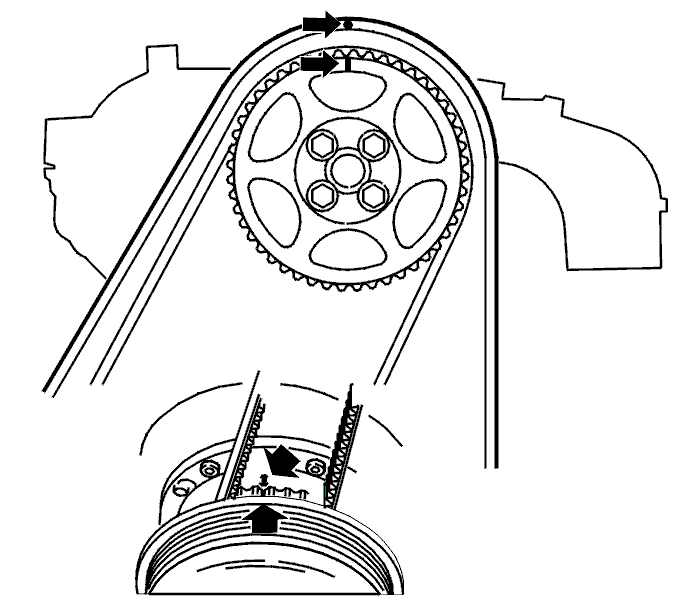 | Remove:-the right front wheel -the nuts for the cover in the wing liner -the lower guard for the timing belt. Turn the crankshaft clockwise until the markings on the crankshaft and camshaft pulley correspond. Turn the crankshaft a further ¼ turn clockwise and then back again until the markings correspond. The markings are illustrated. |
Slacken off the belt tensioner | |
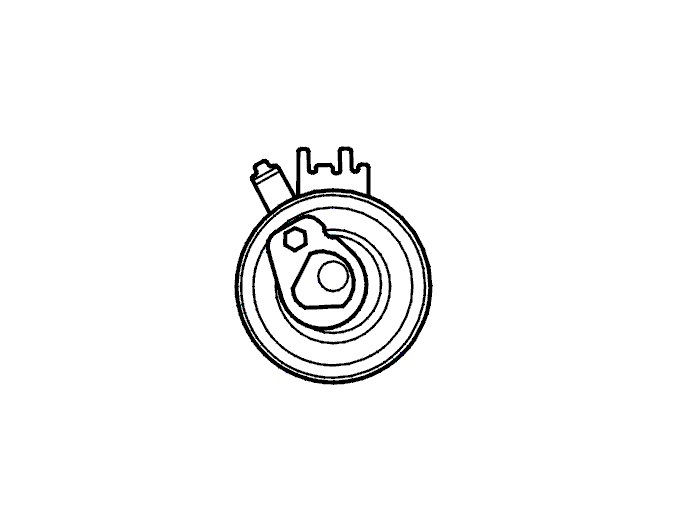 | Slacken off the centre screw for the belt tensioner slightly. Turn the tensioner eccentric using a 6 mm Allen key. Turn clockwise to 10 o'clock. Remove the timing belt from the timing gear pulley. Caution! Do not turn the camshafts or the crankshaft when the timing belt has been removed. |
Checking the tensioner pulley and idler pulley
Check the bearings for wear | |
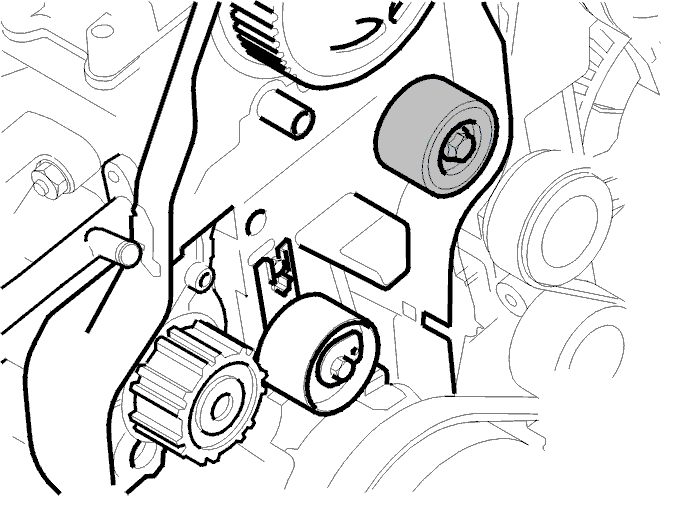 | Spin the idler pulley and listen for noise. If replacing with a new idler pulley, tighten to 25 Nm. Spin the tension pulley and listen for noise. When replacing, screw the tension pulley into place using the centre screw. Screw in the centre screw by hand. Ensure that the tensioner fork is centred over the cylinder block rib. Ensure that the Allen hole on the eccentric is at "10 o'clock". |
Installing the timing belt
Installing the timing belt | |
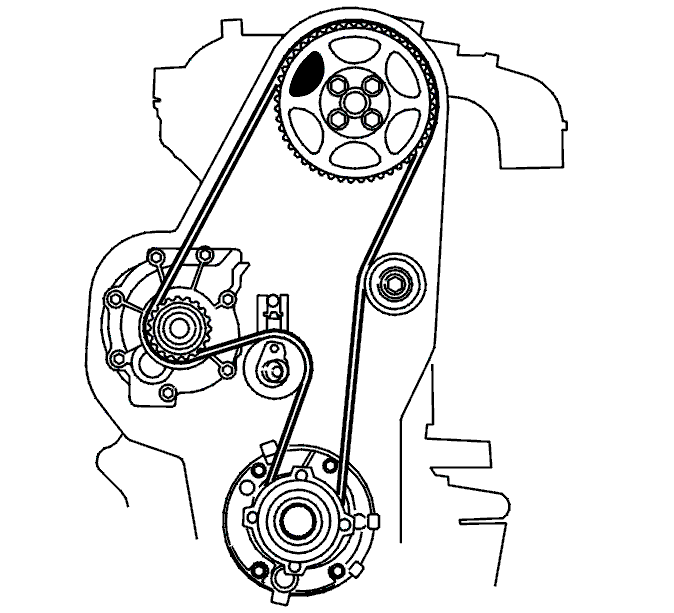 | Install the new belt in the following order:-crankshaft -the idler pulley -camshaft pulley -water pump -belt tensioner. |
Tension the timing belt | |
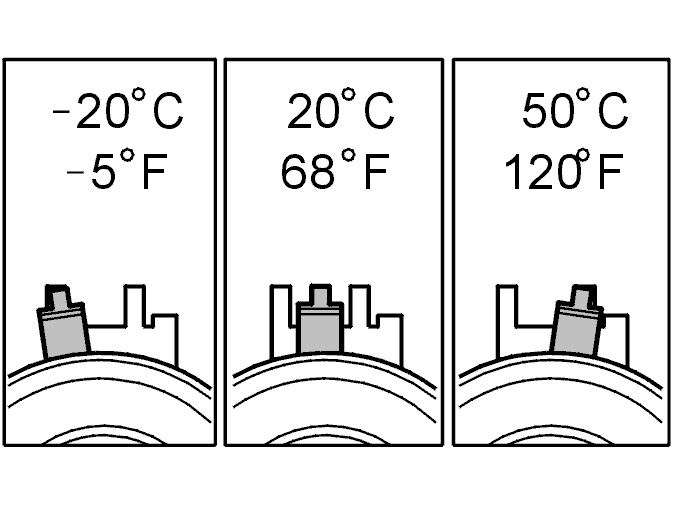 | This adjustment is to be made with a cold engine. A suitable temperature is approximately 20° C. At higher temperatures (with the engine at operating temperature or a high outside temperature for example) the indicator is further to the right. The illustration shows the position of the indicator when aligning the timing belt tensioner at different temperatures. Tension the timing belt as follows:-carefully turn the crankshaft clockwise until the timing belt is tensioned. The belt must be tensioned between the intake camshaft pulley, the idler pulley and the crankshaft -hold the centre screw on the belt tensioner secure. Turn the belt tensioner eccentric counter-clockwise until the tensioner indicator passes the marked position. Then turn the eccentric back so that the indicator reaches the marked position in the centre of the window -hold the eccentric secure and tighten the centre screw. Tighten to 27 Nm. Check that the indicator is in the correct position. |
Checking markings | |
Press the belt to check that the indicator on the tensioner moves easily. Turn the crankshaft 2 turns. Check that the markings on the crankshaft and camshaft pulley correspond. Check that the indicator on the belt tensioner is within the marked area. |
Installing components | |
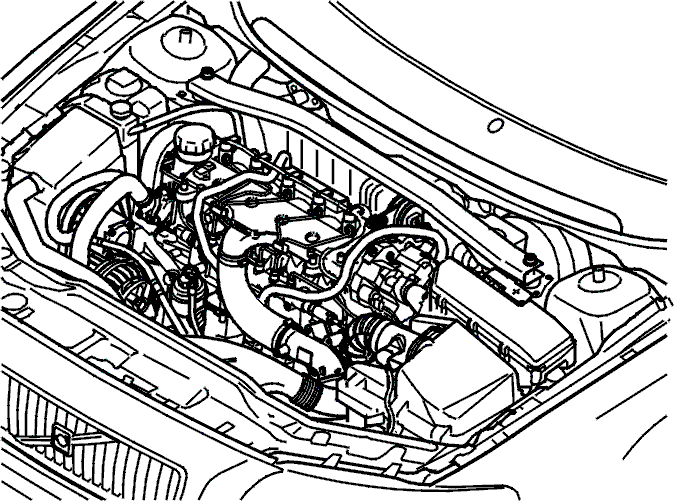 | Reinstall the removed components:-the front timing belt cover -install the auxiliaries belt -the servo reservoir -the engine stabiliser brace. Tighten the screws at the suspension turrets. Tighten to 50 Nm. Tighten the engine bracket screw. Tighten to 80 Nm. Wipe clean and check the engine compartment -a new tie strap for the servo hose -the lower timing belt guard -the hatch in the wing liner -the front wheels. See Installing wheels . |
Function testTest run the engine. |
Replacing the camshaft seals
Removing the camshaft seal
Hint: As the illustrations in this service information are used for different model years and / or models, some variation may occur. However, the essential information is always correct.
PreparationRemove the cable from the battery negative terminal. First read Note when disconnecting/connecting the battery lead . Caution! The crankshaft and the camshaft must not be turned more than is stated in the method description! If the shafts are turned in any other way the valves may be damaged. Remove:-the tie strap for the servo hose from the engine stabiliser brace -the cross stay between the suspension turrets -the timing belt cover -the servo reservoir. Lift up and place on top of the engine. Warning! Ensure that no power steering fluid is spilled. It is extremely flammable! Position the engine according to the marking. See Replacing the timing belt . Remove the belt tensioner. See Replacing the timing belt . |
Removing the timing gear pulley | |
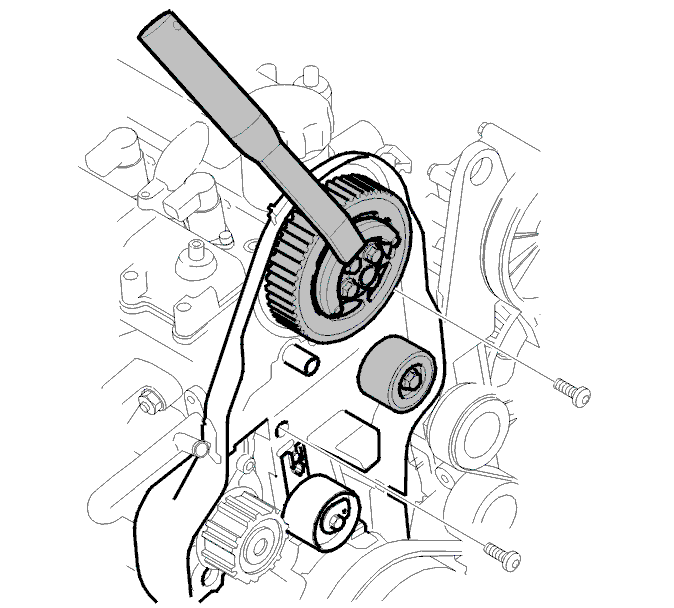 |
Replace the camshaft seal |
Installing adjustment toolsRemove the three mounting screws for the starter motor. Place the starter motor to one side. Remove the blind cover plug and the sealing washer. Turn the crankshaft clockwise slightly to avoid the adjustment tool being in the wrong position. Install adjustment tool 999 7005 . Ensure that the adjustment tool bottoms out against the cylinder block. Turn the crankshaft back counter-clockwise until it stops against the drift. Check that the marking on the crankshaft timing gear pulley corresponds with the marking on the oil pump. | |
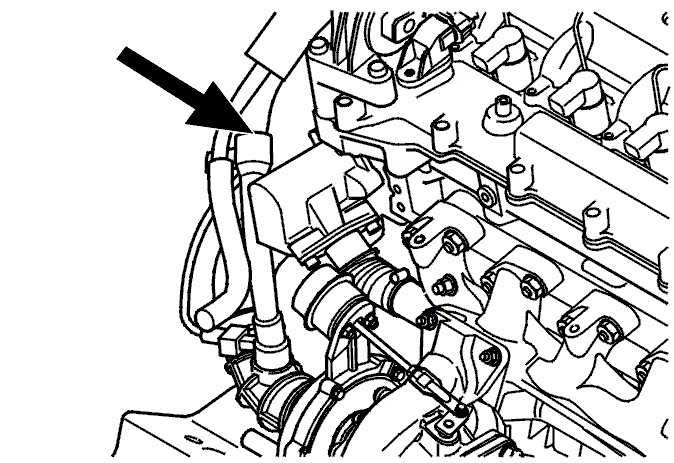 | Remove:-the two screws from the bracket for the crankcase ventilation pipe -the connector and positive power supply in the fusebox -two screws for the fusebox. Lift the fusebox to one side -both the hoses for the vacuum pump. -the screw for the charge air pipe in the vacuum pump. Slacken off the crankcase ventilation pipe at the pipe / hose divider. |
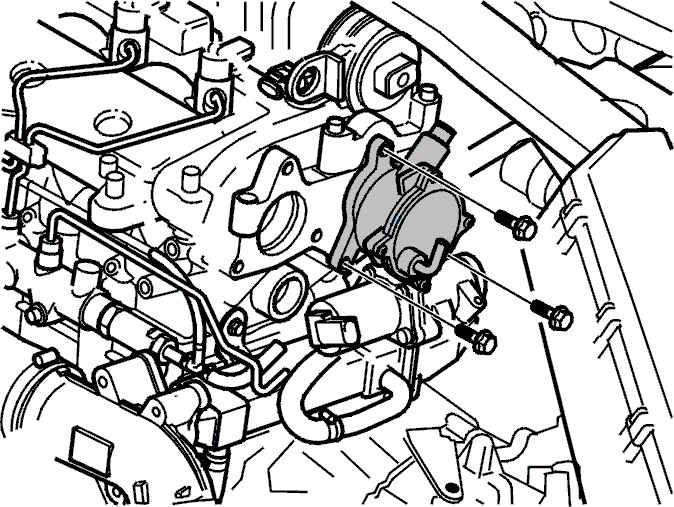 | Remove:-the vacuum pump screws -the vacuum pump. Caution! Handle the vacuum pump carefully. If a pump has been dropped onto the floor it must never be reinstalled. |
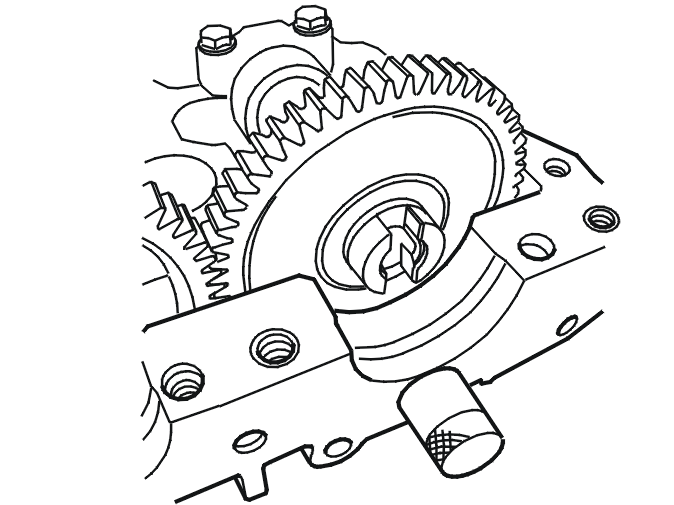 | Install camshaft adjustment tool 999 7007 at the rear of the camshaft. |
Installing the camshaft seal
Installing the timing gear pulley | |
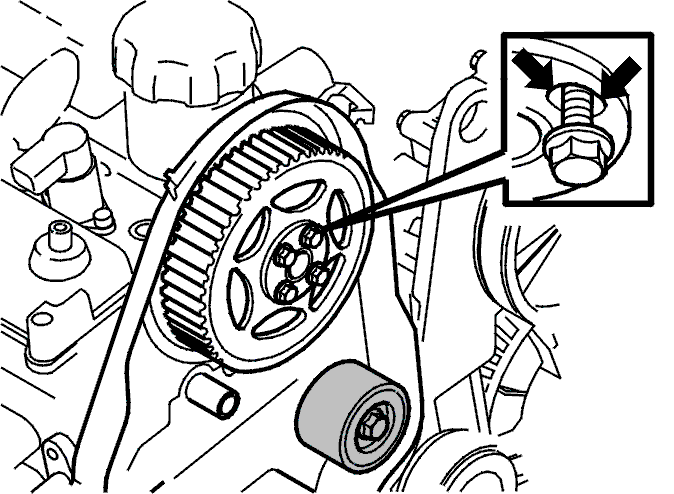 | Install:-the timing gear pulley, using three screws until they just affect the pulleys -the timing belt. Caution! Check that the timing gear pulley screws are not in the limit position in the oval holes. See the illustration. |
Tighten the timing beltTension the timing belt. See Replacing the timing belt . Check that the timing gear pulley screws are not in the limit position in the oval holes. Install the last screw. Tighten all the screws. Tighten to 30 Nm. Use counterhold 999 5199 . Remove:-camshaft adjustment tool -the crankshaft adjustment tool. Install the plug using a new sealing washer. Tighten to 40 Nm. Check the markings. See Replacing the timing belt . |
Installing the vacuum pump | |
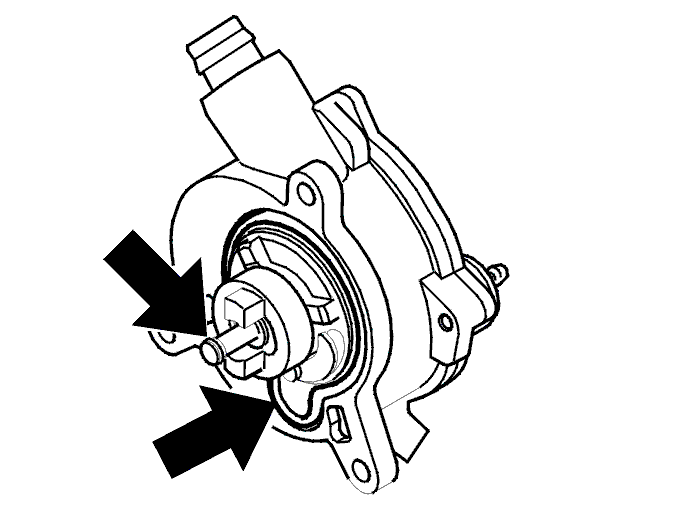 | Install:-the vacuum pump. Use new O-rings. Tighten to 17 Nm -the screw for the charge air pipe -the crankcase ventilation hose and hoses for the vacuum pump. Use lubricant 1161580 on the crankcase ventilation hose and on the vacuum pump quick-release connector -the screws for the bracket for the crankcase ventilation pipe -the fusebox using screws -the positive supply lead and connectors. |
Installing componentsReinstall the removed components:-starter motor -the front timing belt cover -the auxiliaries belt -the servo reservoir. -the engine stabiliser brace. Tighten the screws at the suspension turrets. Tighten to 50 Nm. Tighten the engine bracket screw. Tighten to 80 Nm -a new tie strap for the servo hose -the hatch in the wing liner -the front wheel. See Installing wheels -the cable to the battery negative terminal. First read Note when disconnecting/connecting the battery lead . |
Final checkCheck:-the engine oil level -the servo oil level -the coolant level -the engine compartment and wipe clean. Run the engine to normal operating temperature until the thermostat opens. Check the engine for leaks. Top up the coolant if necessary. |
Auxiliaries belt / belt tensioner, replacing
Note! As the illustrations in this service information are used for different model years and / or models, some variation may occur. However, the essential information in the illustrations is always correct.
Removing the auxiliaries beltRemove the upper engine cover by pulling it straight up. | |
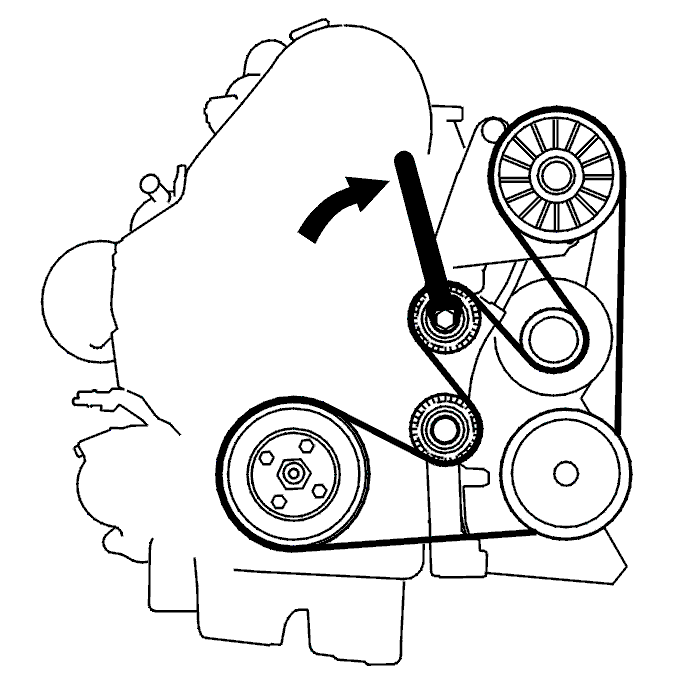 | Remove the plastic cover from the belt tensioner. Use a spanner and turn clockwise as far as possible to relieve the load on the belt. Remove the belt. |
Replacing the belt tensionerRemove:-the plastic cover on the idler wheel -the idler wheel -the two screws for the belt tensioner from the bracket for the auxiliaries equipment -belt tensioner. Install a new timing belt tensioner using two screws. Tighten the screws. See Tightening torque . Install the idler wheel and its plastic cover. |
Installing the auxiliaries belt | |
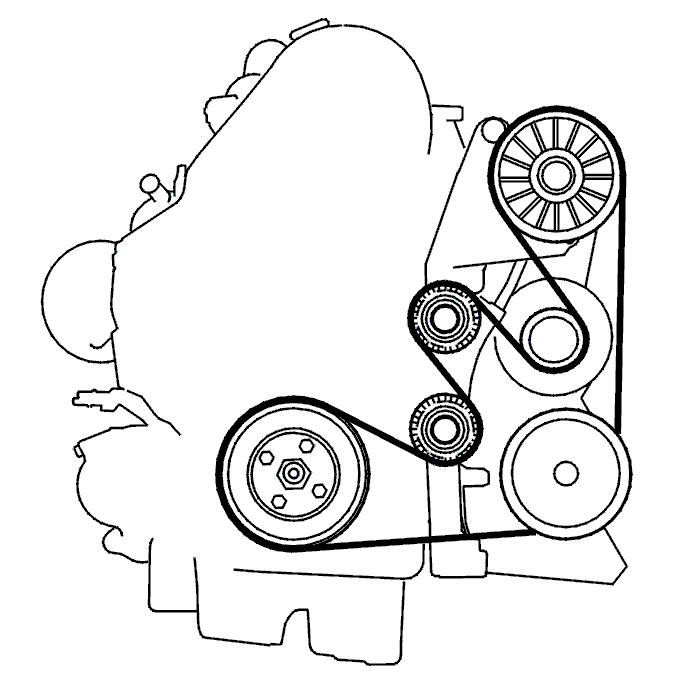 | Caution! Ensure that the belt is correctly seated in all its grooves and on the pulley. Use a spanner and turn the belt tensioner clockwise as far as possible. Position the belt as illustrated. Install the plastic cover on the tensioner |
Checking workCarry out a function test: Start the engine. Check the rotation of the belt and the function of the belt tensioner |